|
|
| ||||||||||||||||||||||||||||||||||||||||||||||||||||||||||||||||||||||||||||||||||||||||||||||||||||||||||||||||||||||||||||||||||||||||||||||||||||||||||||||||||||||||||||||||||||||||||||||||||||||||||||||||||||||||||||||||||||||||||||||||||||||||||||||||||||||||||||||||||||||||||||||||||||||||
| Polarizers | Among other things, polarizers can easily save you from fatal white-outs due to bright reflections—not just off water, glass and car paint, but also off foliage. (Foliage reflections are a serious but commonly overlooked problem in landscape work.) The hard fact is, there's not good post-processing cure for white-outs, especially those complicated by CCD blooming. Polarizers can help you control excess contrast in other ways as well. They also improve color saturation in ways hard to reproduce at post-processing. |
| Neutral density (ND) filters | ND filters allow you to achieve slower shutter speeds or wider apertures than would otherwise be possible in a given scene. (Note that polarizers make decent 1-2 stop ND filters in the absence of polarized light.) |
| Graduated ND (GND) filters | GNDs allow you to reduce excess contrast in scenes that would otherwise be impossible to capture in a single shot. Yes, there are effective post-processing techniques for excess contrast control, but they're not without their challenges, and most require multiple perfectly registered exposures—which means a tripod and remote triggering. |
| Color filters for B&W photography | The transmission spectra of the Bayer pattern filters on your CCD differ dramatically from those of the color filters traditionally used in B&W photography. No amount of channel mixing can change that. |
| IR pass and UV pass filters | Even if you could simulate the surreal luminance relationships found in the near IR (NIR) in post-processing—and I suspect that few could do so convincingly—you'd never be able to fake the phenomenal atmospheric clarity found at NIR wavelengths. Nor would many be able to fake the odd world waiting to be discovered at UV-A wavelengths. |
| UV cut filters (rarely) | In theory, UV filters add clarity by cutting UV scatter in high UV environments—e.g., at extremely high altitude (well over 10,000') or in long shots over water, but most digital cameras are too UV-insensitive to benefit here. Post-processing can suppress or sharpen a hazy blue channel to good effect, particularly in B&W work, but an effective UV filter (most likely a haze filter) might allow you to improve clarity while preserving blue channel data in your color images. |
And the Downside?
Any extra glass in the lightpath between scene and CCD has the potential to degrade your image in various ways—e.g., via internal reflections (lens flare), dirt or aberration. Then again, some shots are feasible only with one or more filters in place. In practice, the trade-offs are seldom that clear-cut, but the trade-offs will always be with us.
Some shy away from filters whenever they can. Others always have a protective filter in place and never give it a second thought. In a previous life, I routinely mounted a high-quality multicoated UV/IR cut filter for lens protection. I now forego the protection to minimize flare whenever conditions permit, but I never hesitate to mount a filter for a particular optical effect if I think it will further my cause.
Only you can decide how fastidious you need to be with your optics. Fortunately, with digital photography, it's never been easier to assess for yourself the quality issues filters raise.
|
|
|
Mounting and Sizing Filters on Digital Cameras
Anyone buying filters for a digital camera sooner or later faces 2 very practical issues—mounting method and size. Camera-to-camera variations are inevitable here, but the basic issues are pretty much the same for digital cameras of the same type (rangefinder vs. SLR). To see how these issues play out on some of Oly's more popular digital cameras, see the dpFWIW article Filters and lens shades for popular Oly digitals.
Mounting Methods and Issues
A few consumer-grade digital cameras still lack mounting threads for filters and other lens accessories, but more and more are designed to be filter-capable, particularly at the higher end. Be sure to check out filter-mounting options before you buy.
Some digital cameras with stationary (non-extending) zoom lenses mount filters directly on the camera lens, like the Nikon CoolPix 9xx series. Others, like the Oly C-2100UZ and the Canon IS Pro90 SLRs, mount filters directly on a lens shroud built into the camera body. Still others, like the Oly Camedia and Canon G1/G2 rangefinders, require a lens tube—in effect, an add-on lens shroud—that screws into a bezel at the base of the zoom lens. Cameras in this last category typically sport bare zoom lenses that extend and retract during use. A lens tube effectively decouples the zoom lens from its accessories, allowing the lens to move freely within the tube without regard for the accessories in use. Camera manufacturers usually offer lens tubes for models that require them, but 3rd party tubes are becoming more and more common. When faced with more than one lens tube option for your camera, keep in mind that
With longer lens tubes, mounted attachments are more likely to cause vignetting, onboard flash shadowing and optical viewfinder obstruction but less likely block the travel of the zoom lens near full extension.
If you also intend to mount converter lenses on the tube, go for the shortest tube you can get to minimize lens vignetting and plan to add step-up rings or shim rings to your filters as needed to prevent zoom lens-filter crashes. A case in point is the CLA-1 lens tube Oly sells for its popular line of digital rangefinders. Oly purposely kept the 41-43 mm CLA-1 short to reduce vignetting when used as a lens platform, even though the camera's zoom lens could then crash into a 43 mm filter mounted directly on the tube. Longer competitors claiming to prevent lens-filter crashes struck at that perceived CLA-1 "flaw", but none of them are satisfactory lens platforms.
Size Matters
The filter-mounting arrangement you choose will no doubt call for a specific accessory size of M mm, but don't take that as a mandate for the filter size you'll actually use, especially if M turns out to something odd-ball like 35.5 mm. Instead, work out and settle on a single, common size F suitable for all your lens attachments—something like 37, 43, 46, 49, 52 or 55 mm. (The most common sizes are shown in italics.)
Note: A browse through the filters offered at www.2filter.com or Camera World or B&H Photo will give you an idea of the sizes that tend to be more available, but bear in mind that B&H tends to carry everything under the sun.
In choosing an optimum filter size F for your digital camera, a number of factors other than availability should also come into play.
Too Small
Too small a filter size promotes vignetting, especially with stacked filters and with double-ring filters like polarizers and round GNDs. Vignetting is always most likely at your camera's widest zoom setting. Since stepping down to a size below M is usually asking for trouble, try to find the smallest common filter size at or above M mm that won't vignette when you stack 2-3 filters on top of your step-up ring at full wide-angle zoom. You may have to take your camera to a shop carrying a wide range of filter sizes to determine the best size. Vignetting can be very hard to detect at onset, especially through an LCD or EVF, so when in doubt, go a hair larger.
Too Large
Bigger is not always better. Oversize filters admit more superfluous light from outside the desired field of view, causing or adding to visible flare. They're also a waste of money. Depending on mounting details and camera geometry, oversize filters can cast a visible shadow in pictures taken with onboard flash. If your camera's a rangefinder, overly large filters can block your optical viewfinder unnecessarily, but the viewfinder won't be an issue on cameras with TLL electronic viewfinders. On some cameras, any size filter may do these bad things, but why make them worse than they have to be?
Just Right
Once you settle on the best filter size F for your camera, stick with it. Get a single M-F mm step-up ring to leave on your camera and a tough, secure F mm lens cap to protect both your camera lens and your F mm filters. Other lens accessories like shades and converter lenses may require additional step-up rings, but if you choose well, the ring collection you end up carrying should be small.
|
|
|
Basic Filter Types and Coatings
The basic filter types discussed in this article are
- Ultraviolet (UV), skylight and haze filters
- Polarizers or polarizing filters
- Graduated neutral density (GND) filters
- Neutral density (ND) filters
- Infrared (IR) and UV pass filters
- Close-up lenses or "filters"
|
|
When these filter types are properly used, you'd be hard pressed to duplicate their effects in post-processing. |
There are many other kinds of filters, of course—warming, softening, colorizing, center spot, vignetting, enhancement, star and so on. Such filters often have very specific applications, but their actions and uses are well beyond the scope of this article.
Round or Square
Like pegs and holes, filters come in 2 main shapes, round and square. The much more common round filters are generally better suited for everyday use, but square filters have their virtues, particularly when it comes to special effects to be applied to only part of the camera's field of view.
For a more comprehensive discussion of these and other filter types, see, for example, Philip Greenspun's excellent and well-illustrated photo.net filter article.
A Word About Optical Coatings
Anti-reflective (AR) coatings promote maximum and clean (single-path) transmission of captured light to your CCD, primarily by minimizing unwanted reflections inside and outside the camera. AR coatings are responsible for the iridescent green to purple sheen visible on most modern camera lenses when viewed at an angle. Optical elements with multi-layer AR coatings are said to be multicoated.
Multicoated filters certainly reduce flare, but the ultimate anti-flare weapon remains a lens hood, also called a lens shade. Digital cameras with built-in zoom lenses work best with a flexible lens hood solution like the rubber Hoya Multi-Angle.
Are there downsides to multicoating besides cost? Any extra glass in the lightpath to the CCD can generate flare under the right conditions, even when multicoated. Salt spray can attack some coatings, especially when allowed to remain on the glass for some time. Some coatings fluoresce brightly in strong shortwave UV light, leading to unexpected flare, even with a UV filter in place, but that's a pretty rare occurrence. Trade-offs will always be with us.
|
|
|
UV, Skylight and Haze Filters
UV, skylight and haze filters all block ultraviolet (UV) light to varying degrees. UV filter nomenclature is a bit confusing. The term "UV filter" by itself usually refers to a neutral (untinted) filter blocking the shorter wavelength UV-B (320-280 nm) and UV-C (10-280 nm) bands while letting a good bit of the UV-A (320-400 nm) through. Haze and skylight filters are UV variants that often carry a tint. Haze filters block more UV-A than regular UV filters but also take a bite out of visible blue. Skylight filters also cut some blue but are no more effective in the pesky UV-A band than regular UV filters.
![]() UV and skylight filters generally require no exposure
compensation, but haze filters may need a small correction. Since uniform
coverage of the entire field of view is usually the intent, round UV filters
make perfect sense. If your UV filter also serves as a lens protector,
rounds are the only way to go.
UV and skylight filters generally require no exposure
compensation, but haze filters may need a small correction. Since uniform
coverage of the entire field of view is usually the intent, round UV filters
make perfect sense. If your UV filter also serves as a lens protector,
rounds are the only way to go.
Why Worry About UV?
By definition, your eyes can't see UV, but ordinary film can, and many CCDs can as well, although to a much lesser extent than film. In theory, there's something to be gained by filtering UV out of the picture. Due to the very short wavelengths involved (below 400 nm), the UV band carries more than its fair share of atmospheric scatter. Scattered UV light can cloud distant backgrounds and impart an unwelcome bluish cast in film images. UV contamination tends to be most problematic at very high altitudes (well over 10,000 feet) and over long stretches of water.
So much for theory. In practice, these theoretical UV filter benefits simply don't show up on the digital side. Under nearly all conditions and for nearly all cameras, UV filters are a waste of money and a potential source of flare for digital photographers.
Purple Fringing Artifact
To my knowledge, the only practical optical role for UV filters in digital photography relates not to scatter, but to an artifact known as "purple fringing" (PF). PF is most commonly seen in digital images but also occurs in film images. It typically appears as a multipixel band of bright purple surrounding the peripheral edges of dark objects cast against a bright background. Central edges are spared. Backlit leaves set against a bright sky are a common PF scenario. A widely accepted theory of purple fringing has yet to emerge, but it's most likely a high-order lens aberration akin to but different from run of the mill chromatic aberration, which instead produces soft red and green fringes on opposite sides of affected objects.
In certain exceptionally UV-sensitive digital cameras, there may also be a contribution from CCD blooming due to UV contamination of sensels already near saturation. Users of the Canon IS Pro90, the Canon PowerShot G1 and other cameras unusually prone to purple fringing may find some relief with a UV filter. Luckily, my ancient Oly C-2020Z rarely produces PF, but later Oly rangefinders are said to be more PF-prone in varying degrees.
Haze Filters
Much of the haze seen in visible light film photographs results from the scattering of UV-A by air molecules, water droplets and particulates. Haze filters provide stronger UV-A filtration than most of the commonly used neutral UV filters, but at a price: They also block some visible blue and impart a variably conspicuous yellow cast in the process. Tiffen claims that its Haze 1 and Haze 2A filters transmit 29% and 0% at 400 nm, respectively. To block UV-A and the haze it carries effectively, you'll need something more akin to a Haze 2A—along with a willingness to "get the yellow out" in post-processing.
Polarizer Instead?
How well you'll succeed in overcoming the color biases introduced by haze and skylight filters, I can't say, but with a favorable sun angle, I prefer to control haze with a polarizer and skirt the issue entirely. (The haze tends to be polarized right along with ambient skylight.) And when I'm really serious about cutting through haze, I mount an IR pass filter instead. Scatter is minimal at near IR wavelengths, as aerial and reconnaissance photographers well know.
Post-Processing Haze
Note that it's also possible to mitigate haze to some extent in post-processing, with or without an optical filter. Applying unsharp masking repeatedly to all channels or to the blue channel alone with very large radius and very low intensity (amount) settings can be surprisingly effective. You'll find a discussion here, but the illustrations don't do the technique justice.
Skylight Filters
Skylight filters are slightly colored (usually pink or yellow) UV filters designed to warm the image a bit by removing some blue light along with the UV. They're generally no more effective at blocking UV-A than ordinary UV filters, but they can be handy in open shade, where blue indirect skylight is the dominant light source. On digital cameras, skylight filters function primarily as warming filters.
But How Much UV Can a Digital Camera Really See?
UV sensitivity seems to vary from one digital camera to the next, but most digital cameras seem to be substantially less UV-sensitive than film. In fact, few digital cameras are UV-sensitive enough to reap a noticeable optical benefit from UV filtration, even in the most extreme UV conditions—at very high altitude (well over 10,000 feet) or in very long shots over water. A good quality multicoated neutral UV filter is as good a choice as any for a lens protector if you feel compelled to use one, but don't expect to see much of a benefit in your digital images.
Cameras like the Canon PowerShot G1 and the Canon IS Pro90 prone to an artifact known as purple fringing are notable exceptions. Fringing turns out to be at least partially suppressible with a UV cut filter in such cameras.
My Oly C-2020Z has enough UV sensitivity to produce UV images with suitable filters, but it isn't in that class. It rarely exhibits purple fringing. Furthermore, I've been unable to detect any visible UV filter effect with an uncoated Tiffen Haze 1, a multicoated Hoya UV(0) and a Heliopan No. 8125 Digital IR/UV cut filter in a variety of UV-rich environments, including long shots over water and at altitudes well above 10,000 feet. Granted, these UV filters have little effect in the UV-A band, where UV scatter is the most problematic, but most common UV filters are in the same boat.
UV Sensitivity Data Points for the Oly C-2020Z
![]() An Oly
engineer once told me that the Oly C-20x0Z has only "1%
sensitivity" to UV (presumably compared to its most sensitive wavelength), but
there's clearly more to it than that.
An Oly
engineer once told me that the Oly C-20x0Z has only "1%
sensitivity" to UV (presumably compared to its most sensitive wavelength), but
there's clearly more to it than that.
![]() For starters, the C-2020Z has enough UV-A sensitivity to pull off UV-A imaging with
a Tiffen 18A filter, even when stacked with a hot-mirror filter to block the
18A's small near-IR window. Similar UV-A photography can be done with the Nikon
D1 and CoolPix 950/990.
For starters, the C-2020Z has enough UV-A sensitivity to pull off UV-A imaging with
a Tiffen 18A filter, even when stacked with a hot-mirror filter to block the
18A's small near-IR window. Similar UV-A photography can be done with the Nikon
D1 and CoolPix 950/990.
Moreover, the quoted 1% sensitivity doesn't quite jibe with the CCD's spectral response plots, which show ~0%, ~0% and ~25% respective sensitivities for the CCD's red, green and blue sensors at 400 nm, the UV-visible boundary. Lens glass readily passes the UV-A near this boundary. How the CCD responds to the shorter wavelength UV-B and UV-C bands, I'm not sure, but the question is largely academic since these bands are poorly transmitted by glass lenses, coated or otherwise.
CCD Protection?
UV filters might provide a bit of CCD protection, as this March, 2000 e-mail from dpFWIW contributor Jay Scott explains:
[E]ach CCD pixel has little color filter on it. These are dye filters, not dichroic, so with exposure to light—especially UV—they will gradually fade or discolor. A UV filter might possibly prolong the life of your CCD. I suspect that fading is not an issue until after the camera is obsolete, though, and it's likely that other components will fail earlier.
I have no data supporting such a benefit, but it makes some sense.
|
|
|
Polarizing Filters
These deservedly popular filters, also known as polarizers, use the inherent polarization of atmospheric scatter, glare and other unwanted reflections to remove such photographic pests selectively and prospectively from the light entering your camera. If you shoot much outdoors, the ability to mount a polarizer is reason enough to invest in a filter-capable camera and the required adapters.
Round polarizers are usually perfectly adequate.
Linear vs. Circular
Polarizers come in two main types, linear and circular, identical in use and effects and differing only in camera compatibility. Specifically, linear polarizers are incompatible with cameras that rely on split-beam optics for functions like metering and auto-focus. High-end digital SLRs may require circular polarizers, but the less expensive linear polarizers will work with most digital cameras, SLRs and rangefinders alike. When in doubt, get a circular.
Benefits and Use
Used properly, polarizers can darken the blue of the sky, highlight clouds, suppress unwanted highlights and improve general color saturation by suppressing atmospheric scatter and color-robbing reflections off water, glass, sunlit foliage, vehicles and even bald heads. (In wide-angle shots showing lots of sky, however, you may get better results with a GND.)
Polarizers are admittedly more complicated to use effectively (and to know when not to bother) than one might hope, but once you develop an understanding of the ways in which scattering and reflection add polarization to light in the photographic environment, polarizers become very simple. Digital rangefinder users often complain that they can't see their rear LCDs well enough in bright sunlight to adjust a polarizer properly under TTL (through-the-lens) control. But as long as you're after maximum effect (as is almost always the case), you can easily learn to adjust a polarizer reliably without TTL control.
Polarizers always require substantial exposure compensation. In strongly polarized ambient light, a polarizer can easily cut to 3-4 stops or more. In the absence of polarized light—or when set at 90° to the prevailing target polarization or target directions—most polarizers end up acting as 1- to 2-stop (0.3-0.6) neutral density filters.
To my mind, there are no polarizer advantages unique to digital cameras, but digital cameras with limited dynamic range can benefit greatly from the selective suppression of excess contrast discussed next. Due to the limited UV sensitivity found in most digital cameras, polarizers also provide a welcome and effective alternative for haze control at favorable camera-sun angles.
The Value of Selective Suppression
Through selective suppression of bright reflections and atmospheric scatter, polarizers can help reduce otherwise unmanageable excess contrast under certain circumstances.
| In the sun-dappled fern shot at right, the white-out highlights have clearly exceeded the camera's dynamic range. In retrospect, a polarizer would have selectively suppressed the white-out leaf reflections, improving color saturation and leaving more dynamic range for the recording of shadow detail. |
![Trailside ferns in dappled sunlight, Robert Sibley Volcanic Preserve, Orinda, California. Reflected sunlight exceeded the CCD's dynamic range in the white-outs. Click for 800x600. [C-2000Z]](http://dpfwiw.com/images/ferns.jpg) |
It's often best to reduce exposure to preserve highlight detail and work to bring up the shadows in post-processing—for example, using tone curves or gamma adjustments. You may well end up with noise in the shadows, but that's usually preferable to blown-out highlights. The more you suppress the highlights with a polarizer beforehand, the fewer problems you'll have in the shadows.
With widely distributed highlights like these, a flat neutral density filter might help you maintain an aperture near the resolving power sweet spot for your lens, but there would be no likely role for a graduated neutral density filter.
I've addressed polarizers, their applications and their use with rangefinder digital cameras ad nauseum in the article Using a polarizer effectively without TTL control elsewhere on dpFWIW.
|
|
|
Graduated Neutral Density (GND) Filters
These Galen Rowell favorites are dark gray at one end and clear at the other. Like a tinted car windshield, GNDs or "grads" typically serve to balance out bright skies against darker foreground scenes, as in the shot of San Francisco Bay below. In doing so, GNDs help narrow the gulf between the human eye's incredible 15 stops of dynamic range and the relatively meager 5-8 stop dynamic ranges found in today's CCDs and color slide films.
To get an idea of what a GND can do for your camera, use your forearm to block the sky on a sunny day and note how much better foreground details and colors come through. If taming the bright sky helps those 15-stop eyes of yours that much, imagine what it can do for even a 7-stop CCD.
| A GND
filter with spot metering on the grass at right would definitely have improved
this sunny shot of San Francisco Bay.
With an amenable scene like this one and a single 3-stop GND filter, you could stretch a 7-stop CCD's effective dynamic range to a factor of 1054 (10 stops) by compressing the dynamic range of the scene by a factor of 8 before it even hits the CCD. |
![Golden Gate Bridge and San Francisco Bay from the Seaview Trail, Tilden Regional Park, Berkeley, CA. Click to see 800x600. [C-2000Z]](http://dpfwiw.com/images/ggb.jpg) |
Two stacked 3-stop GNDs would permit a 7-stop CCD to record light intensities ranging over a factor of 8,192 (13 stops) with full preservation of detail.
Square GNDs
The trick with GNDs, of course, is in hiding the density transition. With a square GND in a Cokin-style holder, you can closely match the transition in the filter to that in the scene by rotating and sliding the filter across the lens. The Singh-Ray GND page offers practical advice on using square GNDs, and their gallery shows many fine examples. Singh-Ray developed their hard-step and soft-step GND line in collaboration with the late Galen Rowell himself, but sized as they are for the Cokin System P holder, their high-end squares aren't well suited to digital rangefinders. (See the Filters for the Oly C-20x0Z article elsewhere on dpFWIW for details on the Cokin System A GND filters I'm now using.) Many more gorgeous film examples of GNDs in action are printed in Rowell's book Mountain Light.
The biggest problem with square GNDs on a non-SLR digital camera is the difficulty in seeing and adjusting the transition via the all too often hard-to-see LCD. An effective LCD shade will often save the day when LCD visibility becomes inadequate.
Round GNDs
With round screw-on GNDs, the fixed transition makes for less flexible framing, but the predictable location of the transition within the field of view is in some ways better suited to TTL control when LCD visibility is limited. These double-ring filters rotate like a polarizer to accomodate transitions well off the horizontal. A 2-stop Tiffen ColorGrad ND 0.6 screw-on GND can be seen at work here.
To the extent that GNDs reduce the total amount of light entering the camera, they also afford some of the advantages offered by flat neutral density filters, as detailed in the next section.
Post-Processing Solutions
There are several effective post-processing techniques for excess contrast control, but they're not without their challenges, and most require multiple perfectly registered exposures, which means a tripod and remote triggering. A GND will allow you to capture suitable scenes in a single handheld shot.
|
|
|
Neutral Density (ND) Filters
Neutral density filters reduce the light entering your camera without introducing color biases. When the effect is meant to be uniform across the camera's field of view, round NDs are perfectly adequate.
In bright ambient light, an ND will allow any camera to reach
-
a slower shutter speed to enhance motion blurring, or
-
a larger aperture to enhance subject-background separation or image detail.
On the digital side, you may be able to accomplish the same thing by selecting a lower ISO setting, with the added bonus of reduced image noise. But when you can't lower ISO enough, an ND (or stack of NDs) can get you where you need to go.
NDs address two practical limitations stemming directly from the small physical CCD sizes typical of consumer-grade cameras—excessive depth of field and diffraction-limited resolving power at smaller apertures. Thanks to the latter, digital cameras seldom offer apertures smaller than f/8. Under bright conditions, that aperture floor can be a real hindrance, but ND filters can fill the gap.
Slowing Down
Forcing a slower shutter speed at a given aperture and ISO enhances motion blurring when that's the goal—say, when photographing flowing water in bright sunlight. Suppose your smallest available aperture is f/8 and your slowest ISO is 100, as is commonly the case on the digital side. At ISO 100, the bright scene will probably require an exposure of ~1/400 sec @ f/8 by the sunny f/16 rule, but you'll need to slow down to 1/25 sec to get the desired blurring. Stacking a 3-stop (0.9) and a 1-stop (0.3) ND filter will nicely bridge that 4-stop gap in shutter speed.
Opening Up
Selective focus enhances subject-background separation by blurring the background to draw the eye to your well-focused subject. By forcing a wider aperture (smaller f-number) than would otherwise obtain at a given shutter speed and ISO setting, an ND filter promotes background blurring by reducing depth of field, which can sometimes get too deep on the digital side, especially in portrait work.
ND filters also allow you to stay near your camera's resolving power sweet spot (often f/5.6 or wider) in bright ambient light.
Density Ratings
You'll often see ND filters listed by their densities. The table below relates density to filter factor and transmittance.
density, filter factor and % transmittance in ND filters |
||||||||
| density | filter factor | % trans | density | filter factor | % trans | density | filter factor | % trans |
| 0.1 | 1.25 | 80 | 0.4 | 2.5 | 40 | 0.7 | 5 | 20 |
| 0.2 | 1.5 | 63 | 0.5 | 3 | 32 | 0.8 | 6 | 16 |
| 0.3 | 2 | 50 | 0.6 | 4 | 25 | 0.9 | 8 | 12.5 |
Technical Note: Density is calculated as log10(transmittance) = -log10(filter factor).
Like filter factors, densities add when stacking filters. Every 0.3 density increment cuts light input by a factor of 2, or 1 stop. With set of 0.3, 0.6 and 0.9 NDs, you can stack together up to 6 stops worth of exposure adjustment, fine-tuning with aperture or shutter priority metering as needed, but keep an eye out for vignetting and flare with multi-filter stacks.
Polarizer as ND
Most polarizers end up functioning as 1- to 2-stop ( 0.3-0.6) ND filters in the absence of polarized light, or when purposely set for minimum effect. If you take the time to calibrate your polarizer in unpolarized light, it can stand in for one of the ND filters you might otherwise carry. My Tiffen circular polarizer is good for ~1.7 stops (0.5D) in unpolarized light, as illustrated below.
|
|
|
Close-up Lenses or "Filters"
These round filter-like screw-on lenses allow closer focusing distances than your camera's native lens could otherwise muster, with or without macro focus. (A magnifying glass does much the same thing for your eye.)
Close-ups are rated in positive diopters like so:
Focal length of close-up lens = 1000 mm / diopter rating
This means that a close-up will provide a sharp image at a lens-subject distance equal to 1000 mm divided by its diopter value with your camera focused at infinity. Focus short of infinity and even shorter lens-to-subject distances become possible. Thus a +4 close-up lens permits a 250 mm or ~10" lens- subject distance with the camera focused at infinity and < 250 mm with the camera focused closer in.
Close-ups are optically inferior to true macro lenses, but they're small, light, easy to carry and require no exposure compensation when mounted directly on the camera lens without an extension or bellows. They typically come in sets—commonly with +1, +2 and +4 diopter lenses—and can be stacked for an additive effect (e.g., +3, +5, +6 and +7 using combinations of the basic set noted above). Tiffen also makes a popular +7 and +10 close-up set.
![]() Stacking order
counts
with close-ups. Always put the strongest close-up
lens closest to the camera lens, then the next strongest, and so on. Also, if
you need to use a filter along with one or more close-ups, mount the close-up(s)
first, then the filter.
Stacking order
counts
with close-ups. Always put the strongest close-up
lens closest to the camera lens, then the next strongest, and so on. Also, if
you need to use a filter along with one or more close-ups, mount the close-up(s)
first, then the filter.
Below is a close-up sample series kindly supplied by dpFWIW contributor Illka Valkila. For the test, Illka mounted 52 mm Soligor close-up lenses on his Oly C-2020Z using an Oly CLA-1 and stacked 43-49 mm and 49-52 mm step-up rings. Fully zoomed in at 3x (105 mm), he manually focused the camera at the minimum available distance of 20 cm. As he added diopters, he moved the camera in to the closest camera-subject distance at which focus could be sustained.
Close-up Samples (click thumbnails to see larger versions) |
|||||
| Close-up lenses | +0 | +1 | +2 | +3 | +3 and +2 |
| Camera-subject distance (cm) | 20.0 | 17.0 | 14.5 | 12.5 | 11.5 |
| Subject width (cm) | 7.3 | 6.0 | 5.2 | 4.6 | 3.8 |
![Test setup. Click to see 560x400 version. [?]](http://dpfwiw.com/images/setupm.jpg) |
![3x zoom with no close-up lens. Click to see 800x600 version. [C-2020Z]](http://dpfwiw.com/images/3xm.jpg) |
![3x zoom with +1 close-up lens. Click to see 800x600 version. [C-2020Z]](http://dpfwiw.com/images/3x+1m.jpg) |
![3x zoom with +2 close-up lens. Click to see 800x600 version. [C-2020Z]](http://dpfwiw.com/images/3x+2m.jpg) |
![3x zoom with +3 close-up lens. Click to see 800x600 version. [C-2020Z]](http://dpfwiw.com/images/3x+3m.jpg) |
![3x zoom with +3 and +2 close-up lenses. Click to see 800x600 version. [C-2020Z]](http://dpfwiw.com/images/3x+3+2m.jpg) |
To gather light preferentially from the optically better central portion of the close-up lens and to maximize the limited depth of field available at short camera-subject distances,
|
|
Use f/8 or smaller apertures with close-ups up to 3+ diopters and f/11 or smaller apertures with stronger lenses. |
Close-up Lighting
Lighting is often the limiting factor in reaching the narrow apertures required for a workable depth of field in close-up work. (Arranging your subject in a single plane perpendicular to the camera back helps a lot, too.) Your camera's onboard flash will often be too harsh to use undiluted at such small camera-subject distances, but decent diffusers can be fashioned from half a ping pong ball taped over the onboard flash, or even from a sheet of plain white paper held between flash and subject. A slave flash positioned off to the side may also help even up the lighting.
If flash won't do, clip a 3x5 card to your camera to reflect additional ambient light onto your subject. With proper white balance, simple arrays of bright desk lamps or battery-powered fluorescent camping lamps can provide the lighting required without introducing harsh shadows.
|
|
|
Didymium Glass Filters
Didymium glass filters (DGFs), more commonly sold as "color enhancers" or "color intensifiers", seek to highlight certain colors without upsetting overall white balance. Red intensifiers, for example, are used to punch up the reds in photographs of fall foliage, red rock country and sunsets. If you're unfamiliar with DGRs, look over Singh-Ray's informative illustrated introduction to DGFs. Noteworthy in there is the warning that
|
|
Neutrals still tend to lose their neutrality with DGFs. |
With Singh-Ray's red enhancer, for example, neutrals take on a magenta cast, especially those nearer medium gray. Of course, warming filters also wreck white balance, but the spikier DGF spectra might make that harder to correct in post-processing. (I probably hit an analogous snag when I try to tweak flower colors, which are also very spikey, and end up trashing all the other colors, including the neutrals.)
I have no experience with DGFs, but everything I've read suggests caution with them. I'd expect DGFs to deliver, for better or for worse, unique color shifts that would be difficult both to emulate and to "undo" in post-processing. In the field, that would mean either knowing exactly when a DGF will truly be beneficial, or playing it safe by bracketing with and without the DGF. I'd imagine that warming filters, with their broad smooth spectra, would be much more forgiving at post-processing.
How DGFs Work
When I first heard the term "didymium", it sounded pseudo-scientific, like something Scotty might throw in the tank when the Enterprise ran low on dilithium. But didymium turns out to be a mixture of two rare earths—praseodymium and neodymium. Glass doped with these elements acquires a very spiky absorption spectrum chemically tunable between near UV and near IR wavelengths. Hence, the National Institute of Standards and Technology can offer narrow-band wavelength calibration DGFs, and Hoya can offer 3 different DGFs functioning as red, green and blue "color intensifiers".
Of course, nothing's really being "intensified" here. Rather, the target color is increased in apparent saturation by surgically attenuating adjacent bands, hopefully without upsetting the overall color balance too badly. For example, a red intensifier cuts yellow through green, much as seen in this "didymium glass" spectrum. A warming filter like the popular Tiffen 81A broadly and progressively attenuates green through violet instead. Compare the typical DGF spectrum (toward the bottom) to that of Helipan's 81A equivalent, the KR3, by scrolling down to the KR3 graph here.
|
|
|
The Great Lens Protection Debate
Protective filters are widely used, but their net value remains controversial. Many 35 mm camera owners shudder at the thought of exposing their precious lenses to the outside world without a protective UV filter or lens hood in place, but many professional photographers categorically reject protective filters in favor of lens caps, rigid lens hoods or meticulous handling.
If your expensive digital camera accepts filters, why not use a protective filter? Here are both sides of the argument. Decide for yourself.
Protective Filter Pros
-
Filters are generally a lot less expensive than lenses.
-
Which would you rather replace, a screw-on filter or a built-in zoom lens?
-
Optically, quality multicoated UV filters have little downside on a properly shaded lens.
-
UV filters generally require no exposure compensation.
Scratches, abrasions, falls and direct blows are obvious mechanical threats to your lenses and filters. Dust, sand, rain and splashes are common dangers as well.
Not so obvious is the potential for irreversible salt spray damage to optical coatings, especially when the salt is allowed to remain on the glass for some time. Consider an uncoated plain or UV filter for that day at the beach, especially if the surf's up and the wind is onshore. Of course, there's always a bit of corrosive salt in the air by the ocean, but an offshore breeze is fairly protective if the surf is calm.
Protective Filter Cons
No matter how expensive or how well coated, filters inescapably degrade the optics of any camera. Filters reflect a small amount of incoming light out of the camera and invite the unwelcome internal reflections known as flare. Flare can be as conspicuous as a series of UFO-like hexagonal blobs of light hovering in the sky or as subtle as a loss of color saturation. With any filter in place, meticulous shading of the lens becomes mandatory. If they're not perfectly flat and parallel to the image receiver, filters can also introduce aberrations. Stacking filters only compounds these problems, but a purely protective filter constantly swapped out for another serving a real photographic purpose quickly becomes a nuisance.
Light loss and aberrations seldom reach practical levels, but flare's a fatal image flaw, and a common one at that, especially when the sun's low in the sky near your subject. Why compromise on quality when careful handling, a lens cap or a rigid lens shade provide adequate protection under most shooting conditions?
Lens Protection Options
Everyone seems to agree that protecting your digital camera's precious built-in lens is always a good idea. The only remaining question is, how? Here are your basic options:
option |
mechanical protection |
cleanliness |
risk of flare |
notes |
| careful handling alone | subject to lapses and ugly surprises | subject to lapses and ugly surprises | baseline | if the lens stays clean, this approach is optically sound |
| lens cap alone | good | good | baseline | simplest setup; no need to remove a protective filter to mount a special-purpose filter |
| filter alone | good | fair | higher | the filter itself needs to be kept clean, and when not serving a specific optical purpose, invites unnecessary flare |
| filter + lens cap | excellent | excellent | higher | as above, but the optics stay clean and now the filter's mechanically protected as well |
| rigid lens hood | fair to good | poor to fair | lower | can be combined with a filter but often precludes using a lens cap |
Under routine shooting conditions, I'm perfectly comfortable relying on a tightly-gripping tethered lens cap fitted directly to my lens tube (decent protection, less chance of flare), but I've been known to slap on a protective filter when things get really rough—especially when there's a lot of blowing dust or salt spray. The same tethered cap protects also my filters, some of which are far from expendable. When flare becomes a concern, as it does when shooting close to bright light sources, I remove all unnecessary filters for the shot.
You'll have to decide for yourself which approach makes the most sense for your temperament and the conditions at hand.
|
|
|
Filters for Infrared (IR) and Ultraviolet (UV) Photography
IR/UV Checklist
Low-Light Checklist
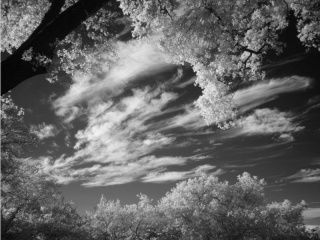
Filters for IR Imaging
The normally invisible near infrared (NIR) world is one of clarity and grace. Better yet, it's readily accessible to digital photographers. The photograph featured at the top of this page was taken with a Wratten 87 IR pass filter on my Oly C-2020Z.
For information on the joys and wherewithal of digital IR photography, including filter choices, technique and many IR links, see the dpFWIW article Infrared basics for digital photographers.
Filters for UV Imaging
The normally invisible ultraviolet (UV) world is full of surprises, as Bjørn Rørslett's UV photography site beautifully illustrates. Many birds and insects rely on UV vision to find food and mates, and many flowers oblige them with eye-catching air traffic control markings visible only in UV light. Long puzzling to humans, the cuckoo's success in laying eggs in other species' nests and getting them tended rather than jettisoned by certain other species now appears to rest on a strong UV resemblance between the eggs of cuckoos and accepting hosts. Visible light differences obvious to humans seem to be unseen or ignored by host birds falling for the cuckoo's trick. (Science News, 4/7/01, v. 159, p. 216.)
UV Challenges
With the waiting fascinations of the UV world come frustrations, however. UV photography is the out-of-spectrum path less trodden—in part because the challenges are much greater than those encountered in IR work, and in part because UV images often lack the gripping appeal typical of IR images. UV photography is very much an acquired taste.
A number of digital cameras—including the Oly C-20x0Z and the Nikon D1 and CoolPix 950 and 990—turn out to have enough near UV (UV-A, 320-400 nm) sensitivity to make UV imaging thinkable, but it's always a stretch due to the long exposures, image noise, atmospheric scattering and focus shifts involved.
The Wratten 18A UV Pass Filter
![]() The most commonly used UV pass filter appears to be the now rather scarce black
glass Tiffen 18A ($76 before shipping from the Filter
Connection in May, 2000). The 18A's filter factor is said to be a whopping 80, or
~6.5 stops, but my bare 18A ranges from 6-9 stops, depending on the NIR and UV
content of the scene. Stacked with a hot mirror to block the 18A's
NIR side lobe, the total light loss is more like 10-13 stops.
Handholding an 18A and hot mirror is folly. I've had some luck with a bare 18A
and a monopod in bright sunlight, but
plan on a tripod for reliably shake-free images, with or without the hot mirror.
The most commonly used UV pass filter appears to be the now rather scarce black
glass Tiffen 18A ($76 before shipping from the Filter
Connection in May, 2000). The 18A's filter factor is said to be a whopping 80, or
~6.5 stops, but my bare 18A ranges from 6-9 stops, depending on the NIR and UV
content of the scene. Stacked with a hot mirror to block the 18A's
NIR side lobe, the total light loss is more like 10-13 stops.
Handholding an 18A and hot mirror is folly. I've had some luck with a bare 18A
and a monopod in bright sunlight, but
plan on a tripod for reliably shake-free images, with or without the hot mirror.
Examination of the transmission spectrum of the original Kodak Wratten 18A gelatin filter shows a significant side lobe in the NIR. To eliminate conspicuous NIR contamination in digital UV reflection photography, you'll need to block that side lobe with a suitable IR cut filter stacked on the 18A. Unfortunately, quality hot mirror IR cut filters can be as pricey as the 18A. To block the IR window in my UV work with a C-2020Z, I use a $10 no-name hot mirror found on eBay. The quality of the hot mirror seems rather irrelevant for UV landscapes, which tend to look pretty noisy and hazy anyway, but it might become an issue in brightly-lit flower close-ups.
Technical Note: The 18A's IR side lobe isn't usually an issue for film-based UV photographers because the ordinary films they typically use seldom have any significant IR sensitivity.
Branches with a Monopod |
|||||
| Filter | Light | Thumbnail | EV | Exposure ISO 100 | Notes |
| None | Visible |
![Oak branches in visible light, Orinda, CA; auto-exposure, monopod. [C-2020Z]](http://dpfwiw.com/images/branches-vis.jpg) |
11.3 | f/2.5 @ 1/500 | An ordinary subject |
| 18A | UV + IR |
![Oak branches through 18A filter, Orinda, CA; auto-exposure, monopod. [C-2020Z]](http://dpfwiw.com/images/branches-18a.jpg) |
4.6 | f/2.0 @ 1/6 | Not so ordinary in invisible light |
| 18A+hot mirror | UV only |
![Oak branches through 18A and hot mirror stack, Orinda, CA; auto-exposure and monopod. [C-2020Z]](http://dpfwiw.com/images/branches-hot.jpg) |
0.7 | f/2.0 @ 2.5 sec | Most of the blur is camera shake |
In the 18A-only sample above, NIR input dominates the image, especially the bright foliage, but UV holds forth in the IR-dark clear sky. The false color schemes in both 18A samples are representative of the renderings dished up by my C-2020Z. The blurring of the sky around the branches is probably part chromatic aberration, part camera shake and part focus shift. For more 18A samples, see the dpFWIW section on UV flower photography.
Theoretically, you could even stack an 18A with a Wratten 25 dark red filter and end up with an IR pass filter, but you'd get shorter exposures and less visible light contamination with an inexpensive R72 IR pass filter.
Invisible (IR+UV) Imaging
The 18A's NIR side lobe is only a debit when pure UV images are the goal. Used alone, the 18A can produce stunning digital invisible light images with dominant NIR and lesser UV contributions. I'm particularly fond of the false color schemes my Oly C-2020Z concocts for the 18A. (See the table above and the dpFWIW section on UV flower photography for examples.) Bjørn Rørslett uses Nikon's 18A equivalent to do what he calls invisible imaging on a Nikon D1, but he balances the IR and UV inputs with a stacked hot mirror. His false color IR+UV images have a look all their own.
In combination with the generous depth of field typical of consumer-grade digital cameras, auto-focus can easily accommodate the focus shift encountered at NIR wavelengths, and to a lesser extent at UV-A wavelengths as well, but it can't cut both ways at once, as it must in IR+UV work. If you can't get the 18A to focus properly, try increasing depth of field by stopping down the aperture and reducing subject magnification as best you can.
UV Practicalities
Since most glass camera lenses and filters absorb strongly in the shorter-wave UV-B and UV-C bands, UV-A is realistically all you'll have to work with. (Special quartz lenses allow UV imaging down to ~200 nm, but they're very costly.) For UV reflection photography, the sun is by far the handiest UV-A source, but a variety of UV-A lamps are also available for studio work, including inexpensive tungsten UV bulbs like the I one used to explore UV fluorescence in chlorophyll. To minimize atmospheric scattering and maximize exposure, bright clear dry days work best for outdoor UV work. Pre-subject scattering losses in incident sunlight will be least around noon.
Scattering
Since the atmosphere's not all that transparent at UV wavelengths, distant vistas tend to make poor UV subjects, especially across water. Atmospheric perspective is markedly accelerated in the UV, and clouds seem to disappear. On the positive side, flowers are fascinating UV subjects, often with surprising results, and water surfaces dance with UV reflections.
Long Exposures
Long UV exposures invite both camera shake and image noise. Solid camera support is an absolute must. The noise can become quite apparent in multisecond exposures. With proper planning, however, low-light post-processing techniques like dark field subtraction and image averaging can effectively reduce the noise burden.
Depending on the spectral characteristics of your lens, you may also have to contend with a wavelength-related focus shift in the UV-A. UV light usually comes to a focus just short of the focal plane suitable for visible light. If UV is the only light coming in, auto-focus (AF) should be able to adjust accordingly, provided AF has enough light to do its magic, but light can get pretty scarce behind an 18A and hot mirror stack. The UV imaging stack does seem to interfere with AF accuracy on my Oly C-20x0Z. Focus shift can be problematic in UV film work, but on the digital side, some of it can be absorbed within the generous depth of field typical of consumer-grade CCD cameras.
If you encounter UV focusing problems, try to widen your depth of field by stopping down the aperture and reducing subject magnification as best you can.
Chromatic Aberration
My C-2020Z also shows a lot of chromatic aberration in the UV. Blue and magenta ghost images are common, especially where sky and objects meet.
For more on the nature of UV light, see the section on UV cut filters above.
IR and UV Filter Terminology—Sheesh!
Everyone knows that a "UV filter" filters out (cuts) UV, just as a "dust filter" removes dust. You'd think an "IR filter" would cut IR by analogy, but in the well-established if regrettable filter vernacular, an ideal "IR filter" like a Wratten 87 cuts everything but IR, just as an "air filter" filters out everything but the air, including the dust.
Obviously, no one's in charge here. Inside and outside photography, filters are named for what they remove or for what they purify, depending on Lord knows what.
I'm guessing our lovely UV/IR filter terminology grew out of the way film photography developed in relation to these parts of the spectrum. (History accounts for much of the really screwy jargon in a lot of other fields, too.)
When film photographers recognized UV contamination, "UV filters" cutting the offending UV were developed to cure the problem. There the focus was on the contaminant. Since most film types in routine use had (and still have) little or no IR sensitivity, no analogous "IR filters" were needed to cut IR. That left the simple term "IR filter" free to be applied to "filters that enable IR photography" when IR photography appeared. Here, the focus was on the goal.
Where does that leave my Tiffen 18A filter—the one that passes UV and cuts visible light? The term "UV filter" is already taken, so "UV pass filter" will have to do.
Now that digital cameras are popularizing IR photography and encouraging forays into UV photography as well, we'd probably all be better off using "pass" and "cut" modifiers to keep our filters straight. But the confusion doesn't end there. A red filter cuts everything but red and looks red, but an "extreme blue" filter cuts the blue and looks yellow.
Hmmm. Is a bathtub drain strainer a baby filter or a bathwater filter? What a mess.
|
|
|
Filter Factors—Exposure Correction
When a filter blocks enough light to require an exposure correction, it typically comes with a filter factor, which is simply a multiplier for the exposure time. In other words, a filter with a filter factor of 3 would increase your exposure time from 1/60 sec to 1/20 sec at constant aperture and ISO. When stacking filters, multiply the filter factors together for the final exposure correction required.
To convert filter factors into stops or exposure values (EVs), use the table below.
EV equivalents for common filter factors |
|||||
| filter factor | EV | filter factor | EV | filter factor | EV |
| 1.2 | -1/3 | 2.5 | -1 1/3 | 5.0 | -2 1/3 |
| 1.5 | -2/3 | 3.0 | -1 2/3 | 6.0 | -2 2/3 |
| 2.0 | -1 | 4.0 | -2 | 8.0 | -3 |
Note the logarithmic relationship between stops and filter factors.
|
|
|
Filter Test: Color Bias and Saturation
Ostensibly neutral filters may not be as neutral as they look when held up to the light or placed on a white surface. Color desaturation due to filter-induced flare is another potential filter downside that can be difficult to assess casually. To get a sense of the risks involved with some of my more commonly used filters, and to gather some additional data points on the controversial issue of IR contamination, I undertook the informal test documented in this section. The results, summarized in the table below, surprised me.
Test Setup
My test subject was a standard 5x7" Kodak Q-60 Color Input Target. Lighting came from a single 60W incandescent aluminum work lamp positioned at bottom right, about 10" from the target. On a tip from RPD, I chose incandescent lighting to increase the chance of catching IR contamination in the act. (The power spectra of ordinary incandescent lamps actually peak in the near IR.)
I shot the target with the 6 filters listed in the results table below on a tripod-supported Oly C-2020Z 10" away in macro mode at fixed ISO 100 with in-camera sharpening enabled to avoid any need for manual post-processing. I also shot a filter-free control image. To remove white balance as a variable, I chose a fixed incandescent preset, and the white balance seems to be spot-on for the control. All the images were recorded at maximum 1600x1200 resolution with the lowest possible (SHQ) level of JPEG compression. To optimize resolving power, I shot all images at f/4 under aperture priority with no exposure compensation. The control image metered consistently at 1/50 sec, or EV 9.6. Exposure variations across the test filters appear in the "EV offset" column; anyone interested could easily calculate filter factors from this data.
Observations and Conclusions
The full-size high-quality 1600x1200 JPEG test images linked by the thumbnails in the results table below are straight from the camera, with no manual post-processing of any kind. I found it best to compare color biases and saturations by flipping back and forth between selected image pairs at full screen.
Filter Test—Color Bias and Saturation |
||||||
| Filter | Filter Type | Coating | EV offset | Test Image (~700KB each!) | Color Bias* | Saturation* |
| None (control) | n/a | n/a | 0 |
![No filter [C-2020Z]](http://dpfwiw.com/images/control.jpg) |
Control | Control |
| Heliopan 8125 | UV/IR cut | Multi | -0.3 |
![Heliopan 8125 "Digital" UV/IR cut filter, multicoated [C-2020Z]](http://dpfwiw.com/images/8125.jpg) |
Warmer, but most accurate | Increased, and best of all |
| Hot Mirror | Dichroic IR cut | unknown | -0.7 |
![No-name hot mirror IR cut filter [C-2020Z]](http://dpfwiw.com/images/hot_mirror.jpg) |
Greener | Decreased |
| Tiffen Haze 1 | UV cut | None | 0 |
![Tiffen Haze 1 UV cut filter [C-2020Z]](http://dpfwiw.com/images/haze1.jpg) |
None | Decreased |
| Hoya UV(0) | UV cut | Multi | 0 |
![Hoya UV(0) UV cut filter, multicoated [C-2020Z]](http://dpfwiw.com/images/uv%280%29.jpg) |
None | Same |
| Tiffen Circular | Polarizer | None | -1.7 |
![Tiffen circular polarizer [C-2020Z]](http://dpfwiw.com/images/cpol.jpg) |
Bluer | Decreased |
| Tiffen Linear | Polarizer | None | -1.3 |
![Tiffen linear polarizer [C-2020Z]](http://dpfwiw.com/images/lpol.jpg) |
Bluer | Decreased |
* Table Note: The bias and saturation ratings are all relative to the control image, which was taken with no filter.
Heliopan 8125 "Digital" UV/IR Cut Filter
Much to my surprise, the Heliopan 8125 image most closely matched the colors and grays of the Q-60 target with regard to color bias and saturation. The match was in fact quite good on both fronts. The control and Hoya UV(0) images were tied at a noticeably distant second place.
After long dismissing IR contamination as a practical concern in visible-light digital photography, I now reluctantly attribute the 8125's undeniable success on the saturation front to its ability to block the ample longwave NIR in this NIR-rich test setup. The 8125's AR coating may have helped it out-saturate the other filters via reduced flare, but that doesn't account for its impressive saturation relative to the control. Note that the 8125 is most effective against longwave NIR, which stimulates the CCD's red, green and blue sensels equally. In an IR-sensitive camera like the C-2020Z, longwave NIR attenuation would improve color saturation across the board. All the configurations tested pass shortwave NIR, which tickles primarily the red sensels.
It's safe to assume that UV attenuation was no more effective in improving saturation over the control for the 8125 than it was for the other two UV cut filters tested. For one thing, there would have been very little UV input in this indoor test setup. The 0.3 EV light loss posted by the 8125 must have come primarily from the longwave NIR attenuation provided by this ostensibly clear filter. Light loss due to external reflection was probably no greater in the 8125 than it was in the similarly coated Hoya UV(0), which posted no EV offset.
My 8125 got an early retirement when I failed to detect any visible benefit in outdoor test images, as illustrated and discussed here, but now I plan to give it another try, at least in close-ups under heavy incandescent lighting.
Hoya UV(0) and Tiffen Haze 1 UV Cut Filters
The Hoya UV(0) image was nearly indistinguishable from the control in both bias and saturation. In fact, neither of the UV cut filters tested introduced a discernable color bias relative to the control. Some of the more restrictive haze filters may impart a yellowish cast, but not the Tiffen Haze 1.
The noticeable saturation hit posted by the uncoated Haze 1 relative to the multicoated UV(0) confirms the reality of diffuse flare (manifest only as reduced saturation or contrast) in the absence of gross flare (manifest by a conspicuous ghost image of a light source outside the field of view). More importantly, this finding reaffirms value of a good anti-reflective coating.
I still can't tell which of these UV cut filters does a better job against UV-A, but since the Hoya UV(0) matches the control and clearly affords better saturation the Haze 1, the Haze 1 goes back in the closet for now.
Hot Mirror IR Cut Filter
My cheap no-name hot mirror imparted an obvious and undesirable greenish cast. The 0.7 EV light loss largely came out of the NIR and visible red bands. Clearly, this filter has no viable role against IR contamination in visible light work, but it continues to play a very important role in my digital UV photography.
Tiffen Circular and Linear Polarizers
Both polarizers imparted a barely visible bluish cast. The circular polarizer took a slightly larger bite out of the incoming light. Turning the polarizers' adjustment rings made no meterable exposure difference, confirming the absence of any significant amount polarized light in the test setup.
The circular polarizer's exposure offset indicates that it functions as a 0.5 ND filter in unpolarized light. The linear is a bit less dense at ~0.4. Since the circular's also the more effective polarizer by a wide margin, the linear goes back in the closet. I'll keep the faint blue cast in mind during post-processing.
|
|
|
References and Links
(See also the home page links.)
General Filter Information
Rowell, Galen, Mountain Light, 2nd ed., Yolla Bolly Press, Sierra Club Books, San Francisco, 1995—to many, the bible of scenic photography.
Philip Greenspun's filter article—comprehensive and well-illustrated, on photo.net, of course.
Filters for Outdoor Photography—an excellent introduction to polarizing, GND and other filters by accomplished photographer Darwin Wiggett.
Robert Monaghan's filter article—a wealth of authoritative information and links.
Tony Collins' close-up article—this well-written and nicely illustrated piece also covers makeshift lighting for close-up work.
UV and Polarizing Filter FAQs—a well-written and informative FAQ section within a site that otherwise appears to be largely under construction.
"Tiffen Filter Facts"—a well-illustrated, fact-filled pamphlet/catalog packaged with Tiffen filters. The Tiffen filter web page has filter specifications and many color illustrations of filter effects.
Light Measurement Handbook—Alex Ryer's thorough, well-illustrated and surprisingly readable on-line treatise on the properties, behavior and measurement of light.
Photographic Filters, Light Conversions and More!—an eclectic site with lots of information on filters and photographic optics, including many filter transmission spectra.
Filterzone—this comprehensive article is part of the Black & White ArtZone, a rich photographic resource by Eliadis Elias "dedicated to black and white photography". It contains useful information on many different filter types, including those of interest to color photographers.
UV Photography
Enter the Unreal World of Ultraviolet Colour Photography—Bjørn Rørslett's fascinating, copiously illustrated and comprehensive film-oriented UV photography site.
Ultraviolet Photography—Ed Scott's photo.net article provides many technical details and equipment sources.
Ultraviolet Photography—a practical article by Eliadis Elias featuring UV techniques from archeological photography.
Willem-Jan Markerink's Photo Homepage—another eclectic site with lots of information on filters and photographic optics, with an emphasis on IR and UV photography.
Filter Suppliers
CameraWorld of Oregon, AKA cameraworld.com—High marks on selection, price, shipping and handling charges, return handling and website layout. You can even talk to a variably knowledgeable salesperson when you need to. Many other well-known on-line DP vendors offer more limited selections of accessories adaptable to the C-20x0Z. I've purchased most of my auxiliary lenses, filters, adapters and step-up rings here.
The Filter Connection—lots and lots of filters, filter information and filter-related camera accessories, including lens hoods and multicoated filter cleaners. Best of all, you even can discuss your filter purchases with a real live knowledgeable human here!
The Singh-Ray Gallery—A great place to see a variety of filters in action in the hands of pros. Singh-Ray makes high-end filters, both rounds and squares for the Cokin System P holder.
|
|
|
Unless explicitly attributed to another contributor, all content on this site © Jeremy McCreary
Comments and corrections to Jeremy McCreary at dpFWIW@cliffshade.com, but please see here first.
|